KYC & AML for Your Users
What is KYC & AML?
HollaEx offers a built-in KYC/AML system for the users of your exchange, through its partnership with iDenfy. You can also opt in to another provider instead (see Other KYC providers).
When one of your users verifies, iDenfy checks their ID document and a live selfie, and screens them for AML (sanctions, PEP and adverse-media lists) in the same check.
This is different from the Verification page under Account in the dashboard sidebar. That page verifies you, the exchange operator. KYC & AML verifies your exchange's users.
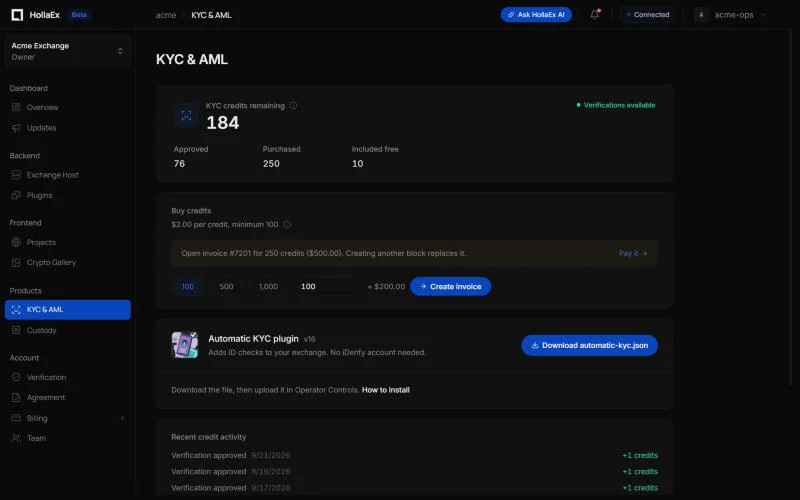
You manage it from the KYC & AML page in the dashboard sidebar (under Products): dash.hollaex.com/kyc.
The plugin behind it is called automatic-kyc. It connects through the HollaEx Network, so you don't need an iDenfy account, API keys or a setup fee with iDenfy.
How much does it cost?
- $2 per approved verification. That price covers the identity check and the AML screening.
- Rejected verifications are free. If iDenfy rejects a user, no credit is used.
- Each approved identification is charged once. If iDenfy resends the result, or the exchange fetches the same result again, it isn't charged twice.
You pay in advance with KYC credits. One credit is one approved verification. New exchanges come with 10 free credits to get started. Credits are sold in blocks of at least 100 credits ($200); above that you can buy as many as you like.
How do I see how many credits I have left?
Open the KYC & AML page. It shows:
- your remaining verification credits;
- how many verifications have been approved (one line per approval in the activity list), how many credits you bought and the 10 free ones;
- whether verifications are currently available (they pause at zero credits);
- your recent credit purchases.
Credits belong to one exchange. If you run more than one exchange, each one has its own balance.
How do I buy more credits?
On the KYC & AML page, choose how many credits you want (minimum 100) and click Create invoice. You are taken to Billing to pay it by crypto, card or bank transfer, like any other invoice. The credits are added to your exchange as soon as the invoice is paid. Only members with the billing role can buy credits; every member can see the balance.
What happens when I run low or run out of credits?
When your balance drops to 20 credits, the exchange owner gets one email warning them to top up, and one more if it reaches zero. It's sent once, not every time a verification happens. Each purchase re-arms the warning, so after you buy credits you'll be warned again the next time it drops that low.
When you run out, your users can't start a new verification. They see "Identity verification is temporarily unavailable. Please try again later." The billing reason is never shown to them. Instead, the plugin emails your operators (at most once a day) with the network's actual reason, "Exchange has insufficent KYC credits. Please purchase more credits to proceed." Verifications already in progress still finish. Buy more credits and your users can verify again within a minute. You don't need to restart anything.
How do I set up automatic KYC on my exchange?
There is no enable or activation step. The plugin works as soon as it is installed, for as long as your exchange has KYC credits.
- Have credits. New exchanges start with 10 free ones; buy more on the KYC & AML page whenever you like.
- Check your plan. Installing plugins needs the Enterprise plan on HollaEx Cloud. If your exchange isn't on Enterprise, the plugin's button on the dashboard's Plugins page shows Enterprise; open a ticket from your HollaEx dashboard to upgrade.
- Open Operator Controls. Click the Operator Controls button on the Overview, My Exchange or Hosting page and sign in with your exchange operator account.
- Install the plugin. Go to Operator Controls → Exchange → Plugins, find automatic-kyc under Available to install and click Install. No file download is needed. (Alternatively, download automatic-kyc.json from the KYC & AML page, then click Add plugin on the Plugins page and upload it.) The exchange restarts to load it.
- Configure it. Open the installed plugin and set:
- manual_review: on means an admin has to approve each passed verification in Operator Controls before the user is upgraded. Off means users who pass are approved automatically.
- auto_reject: on means a user who fails is rejected automatically. Off means they're set to pending for you to review.
- utility_bill: on asks users to also upload a utility bill (proof of address).
- success_path, error_path, unverified_path: where users go after verifying. The default for all three is
/verification. - country (optional): a two-letter country code the document must be from, for example
gb. Empty accepts any country. - documents (optional): comma-separated document types the user may present, for example
PASSPORT,ID_CARD. Empty accepts any. A value the plugin doesn't recognise blocks new verifications (users see "temporarily unavailable" and you're emailed) until it's fixed, rather than silently allowing everything.
- Save and restart the plugin if Operator Controls asks you to.
- Test it. Sign in to your exchange as a test user, open Verification, and start identity verification. An approved test uses one credit.
Once it's running, your users verify from the Verification page on your exchange. Approval marks the user's identity as verified; it doesn't change their tier by itself. To move verified users to a higher tier automatically, also install Tier Upgrade After KYC. Use tiers (Operator Controls → Exchange → Configuration → Tiers) to decide what each tier can do, such as higher withdrawal limits.
Keep the default tier restricted (for example, no withdrawals) and let Tier Upgrade After KYC move verified users up. That way nobody withdraws without passing KYC.
Where do I review my users' KYC results?
In Operator Controls, open Operations → Review Queue → ID Verification. Open a user to see their iDenfy documents and result. You can approve or reject there. Manual review is required when manual_review is on, and for users left pending when auto_reject is off.
The plugin also has its own admin page: open it from Operator Controls → Exchange → Plugins. Its Overview shows the exchange's remaining KYC credits, how many identifications are waiting for iDenfy or for your review, approvals, rejections and expiries over the last 30 days, the last poll, and the settings in effect. The Identifications tab lists recent identifications with buttons to refresh a user's result from iDenfy, approve or revoke them.
Troubleshooting automatic KYC
- "Exchange has insufficent KYC credits. Please purchase more credits to proceed." (in the operator alert email; users just see "Identity verification is temporarily unavailable"). You're out of credits. Buy more on the KYC & AML page.
- "Plugin is not activated." This message came from an older version of the network and no longer exists. If a user still sees it, the exchange is running an old backend; update it from the Hosting page.
- "The verification is processing. Please wait and retry after 5 minutes." The user just submitted a verification. They can start a new one after 5 minutes.
- A user finished iDenfy but still shows pending. Results usually arrive within minutes. The plugin also polls every 10 minutes for verifications from the last 24 hours that have no result yet. A session that is still unfinished two hours after it started is rejected automatically so the user can start again (no credit is used). If a verification stays pending beyond that, review it manually in the Review Queue.
- The plugin doesn't appear under Available to install. Make sure your exchange is running and up to date. If it still doesn't appear, contact support.
For the plugin's settings reference, see Automatic KYC.
Other KYC providers
The built-in automatic-kyc plugin is the default, but you can opt in to another provider if you prefer a different vendor or your licence requires a specific one. These plugins replace the built-in flow and are installed the same way:
| Provider | Plugin | Notes |
|---|---|---|
| Sumsub | Sumsub - Automatic KYC | You bring your own Sumsub account |
| Persona | Persona - Automatic KYC | You bring your own Persona account |
| Shufti Pro | Shufti Pro - KYC & AML | KYC and AML in one; you bring your own Shufti Pro account |
| MetaMap | MetaMap - Automatic KYC | Formerly Mati; you bring your own MetaMap account |
Transaction risk screening (KYT)
To screen deposits and withdrawals against blockchain risk intelligence and hold suspicious transactions for review, use one of these plugins:
- Scorechain - Crypto Risk Screening
- AMLBot - Crypto Risk Screening
- TRM Labs - Wallet & Transaction Risk Screening
To release small deposits automatically while keeping larger ones on hold, see TxAnalysor.
Related compliance features: the Travel Rule and the security options under Under Attack?.