Trial Exchange Setup Guide
This guide walks you from your first dashboard login to a live trial exchange. Your exchange has two parts that you set up in order:
- The exchange backend (API, trading engine and database), set up on the Hosting page.
- The exchange website your users visit, set up as a project on the Projects page.
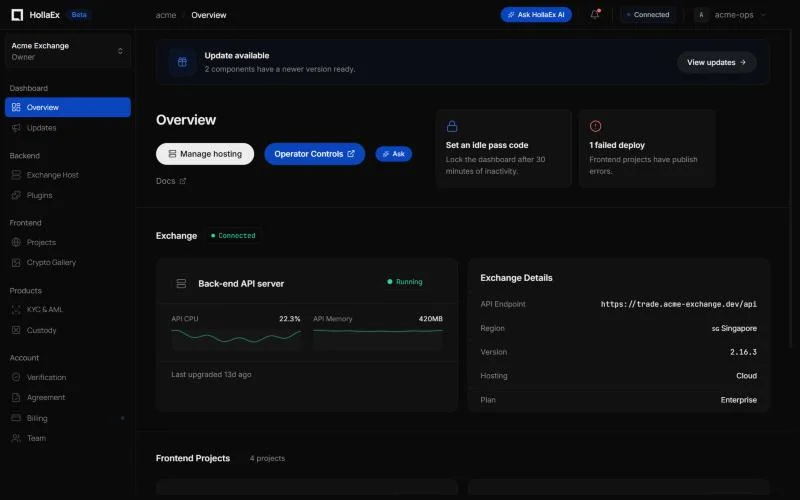
The Overview page shows how many trial days you have left, and its Setup Guide ticks off each step as you complete it.
You need Cloud Dashboard credentials. They are emailed after your call with the HollaEx team, once your Operator Trial application is approved. If you haven't applied yet, apply at hollaex.com/start, or read How HollaEx works first.
1. Sign in to the dashboard
- Go to dash.hollaex.com, enter the credentials from your account details email and click Sign in.
- Check your inbox for the verification email and copy the code. It is single-use and expires after 5 minutes.
- Paste the code and click Continue.
To secure your account with two-factor authentication or invite your team, see Account, Security & Team Members.
2. Configure the backend domain and go live
The backend domain serves your exchange's API and core trading. It is not the address your users visit: that is the website domain, which you set up in step 3.
- In the Setup Guide on the Overview page, click Open Hosting.
- On the Domain tab, choose Use HollaEx-assigned domain to get a free domain right away. You can connect your own domain later.
- Review the assigned backend domain and click Save.
- Click Go Live, then confirm with Go Live again. Go Live stays disabled until a backend domain is configured. Deployment usually takes a few minutes, and can take up to about 30 minutes.
- Follow progress under Recent Deployments or on the Events tab. The page updates automatically, and you get an email when the exchange is ready.
When deployment finishes, your exchange backend is running. For everything else on this page, see Exchange Backend Hosting.
3. Create and publish the exchange website
- Go to Projects in the sidebar, or open it from the Setup Guide. New Project stays disabled until the backend from step 2 is set up, and only owners and admins see it.
- Click New Project and choose Choose from Gallery.
- Pick HollaEx Web v3 (featured, marked Site Studio · AI). It connects to your exchange backend automatically, and you design it later in Site Studio.
- Click Publish and give the site a name. This creates the project; the site isn't online yet.
- On the project's Domain tab, click Configure Domain, choose Use HollaEx-assigned domain, click Apply, then Apply Now. This saves the domain and publishes the site.
- When the deploy finishes, copy the domain and open it in a new browser tab.
You can create and publish a Web v3 website during the trial. Site Studio itself unlocks once your plan is paid. See HollaEx Web v3 & Site Studio.
4. Create the administrator account
The first time you open your exchange website, it asks you to create the exchange administrator account. This is the account you use to sign in to Operator Controls. It is separate from your dashboard login, and it can use a different email.
- On your exchange website, click Begin Account Creation.
- Enter the administrator email and create a password, then re-enter it and click Proceed.
- Log in with the administrator account you just created.
Save the administrator email and password securely. They can't be recovered later.
5. Complete the exchange setup wizard
You can change most of these settings later in Operator Controls. The exception is your 2FA configuration.
- Scan the QR code with your authenticator app, enter the generated 2FA code and click Proceed. If you're not sure how, use the Click here for directions link.
- Continue through the remaining steps with Proceed.
- You can set up email later: click Skip this step if you want. See Email (SMTP) Setup.
- Click Confirm to finish, then Enter Your Exchange.
- Select a trading pair from the list to open the trading view.
Your trial exchange is now live.
Next steps
- Use your own domain. Connect a branded domain to your website in Connecting a Domain to Your Website. The backend domain is changed on the Hosting page.
- Send email from your domain. Set up email so users get sign-up, security and transaction emails. See Email (SMTP) Setup.
- Add assets and markets. List coins and open trading pairs in Assets & trading pairs.
- Verify your users. Set up identity verification and wallet screening in KYC & AML.
- Add liquidity. Run the included market-making bot, powered by OctoBot, or set up liquidity pools.
- Keep your exchange running. Pay before the trial ends, or the trial exchange and its websites are terminated. See Billing.